I could tell you how funny it was that there was a whole block of frozen-thawed spinach in my fridge, but after typing the story, it wasn't that funny.
So, in need of not wasting the $1 thawed spinach, I bought artichokes, alfredo sauce and cheese to make:
Creamy Spinach Artichoke Dip
1 package of frozen spinach, thawed and drained
1 can (14oz) of artichoke hearts, drained
1 can of Alfredo sauce (I used the Classico brand)
1 cup of Italian cheese blend (mozzerella & parmesan)
Chop the spinach and artichoke heart up. Mix everything together in a casserole dish and bake for about 20 minutes at 325 until it's bubbly and browning.
Serve with some crackers or chips! We love it with pita chips or Costco's multigrain tortilla chips!
Friday, November 19, 2010
Monday, November 15, 2010
Toddler Purse

I started with a pattern for a scripture case, but of course I didn't follow it. This tutorial from Make It and Love It, is a great idea for a basic bag. Seriously, it's like cut 4 rectangles (I think mine were 12x9). Sew the bottom and sides, make the corner and add the strap. I didn't add any pocket, just a magnetic clasp- which I think the hardest part was thinking through which directions the magnets went so they didn't repell each other! I don't think it took more than and hour or two!
And from what I hear, she loves to play with it! Can you think of a little girl that would love this for Christmas? I can think of another niece that might!
Monday, September 27, 2010
Burp Cloths
 So, the other day the DH had a little talk with me about FINISHING my projects instead of getting involved in too many more new ones. I guess I just see things, get ideas and then get excited to start them without finishing the one I'm working on. On my list was to make some "good" burp rags. With Landen I had a few cute ones that were totally impractical at catching his spit-up and then I had cloth diapers. I really wanted something in between for Baby Girl.
 I found a few tutorials online and they all seemed pretty basic. I basically followed this one. I did make one that was shaped more traditional, but decided it was easier to just use the rotary cutter instead of cute out all the layers with a pattern.
So, here's a run-down of what I did. I bought 1/2 yard of pink chenille. So the tutorial called for pieces that were 10x16, but I figured that if I did mine 9x15 I could actually get 8 instead of 6. I cut my fabric the same size, and then decided I wanted to round the corners because I hate trying to get good squares.


And there they are! Hopefully they are as useful as they are cute!

Wednesday, September 22, 2010
Ahhh...
There is just something about getting a quilt put together. You work on all the squares individually and that's nice, but there is something about having the whole thing done (or almost done). A sense of accomplishment and excitement to get it finished!


Isn't it cute? I just couldn't resist the puffy quilt. I think I'm going to find a bright pink or purple minky fabric for the back and to give it a nice thick binding and then tie it with some ribbon?
At first, I was thinking that these squares were a pain, but I think they are totally worth it now. I wouldn't take on a full sized quilt, but a baby quilt was quite practical. Want to make your own? I used the tutorial at honeybearlane.
Tuesday, September 14, 2010
Monkey Bread
It's funny... When I think of monkey bread, it brings me back to high school with friends at Wendy's and yet it also brings me back to my Grandma's kitchen.
Today, I'm sharing my Grandma's recipe. It's more of a dinner roll recipe and less of a dessert. I was thinking about making her rolls for dinner but didn't want all the work and the great big batch, so I was thinking about another roll recipe that was a little easier. Thumbing through her cookbook I found the recipe for Monkey Bread and knew this was the perfect compliment to our dinner.
Monkey Bread (click here for print-friendly version)
2 cups warm water
1/2 cup sugar
1 TBSP salt
1TBSP yeast
2 eggs slightly beaten
2TBSP oil
1 cube margarine (1/2 cup)
About 5-6 cups flour
Add sugar, salt and yeast to warm water. Let sit about 10 minutes or until nice and bubbly. Stir, add oil, beaten eggs, and 3 cups of flour and mix well. Let sit about 10 minutes. Add rest of flour mixing with spoon, kneading until satiny. Cover and let rise. (about 1 hour)
Roll out dough about 1/4-1/2 inch thick. Cut in 3” circles. Melt margarine and add half to bundt pan. Stand circles in bundt pan like a pinwheel. Pour rest of margarine on top of circle. Let rise to top of pan. ( about 20-30 minutes, I turn the oven on to preheat and set the pan on top of the stove so it's nice and warm and rises faster!)
Bake at 350 for 25-30 minutes
Happy Baking!
Wednesday, July 7, 2010
I'm not so Very Talented..
I used some scraps from my guitar strap to make Landen a new t-shirt. And, I messed them up a little. They aren't sraight and in the wrong order! I was trying to put the odd one in the middle.

Oh well!

He still looks cute!
Oh well!
He still looks cute!
Sunday, June 20, 2010
Guitar Strap Tutorial
I started making my guitar strap by following this tutorial. But I wanted to use only 1 piece of fabric. So I made my own tutorial to share with you!
Supplies:
About ¼ yard of fabric,
Strip of fusible fleece or fusible batting
Thread and sewing machine
Supplies:
About ¼ yard of fabric,
Strip of fusible fleece or fusible batting
Thread and sewing machine
Step 1: Measure your guitar strap. Mine was 2" wide and Michael keeps his strap about 45" long. So I decided I wanted my strap to be 3" wide and 43" long. I would recommend going at least an inch wider than your strap. Double that and add ½ inch on both ends for your seam allowance. So, I used a strip of fabric that was 6 ½ inches wide and just went salvage edge to salvage edge. I then cut a strip of fusible fleece 3" wide.
 Step 2: Press your fabric. I was trying to follow a pattern, so I ironed along the lines in the fabric, making my pattern 3" wide and ironing the rest under. The fabric should overlap about 1/4inch. This would put the seam going down the middle of the back. You could also just fold it in half and make the seam along the side.
Step 3: Fuse Fleece/Batting to strap. Open the fabric up and fused the fleece to the wrong side of the fabric. The fleece should go down the middle between the two presses. If you were doing a side seam, I would line the fleece up along the fold in the middle and place the fleece ¼ inch from the edge and press.

Step 4: Hem the short ends. Since my ends were both salvage edges, I just folded it up and hemmed. If you wanted any decorative quilting on the top of your strap, this would be the time to do it.

Step 5: Pin along the long side (right sides together) and then sew. Use a 1/4inch seam allowance. Press seam open.

Step 6: Turn. I then sewed along the long side edge to give it some stability so it wouldn't twist. I tried to do mine a little less than 1/4, so it was just slightly shorter than my foot.
Step 7: Slide over guitar strap. This took a little bit of time to jimmy it on, but I wouldn't have made it any wider to make it easier to get on. It fit about perfect!

Ta Da! We're done! Brand new guitar strap! It made a great Father's Day Present!
Tuesday, June 15, 2010
Bucket Hat
I followed the tutorial provided by Sew Much Ado at U Create and made this! It doesn't take much fabric, and it went quite quickly! I still need some practice sewing a cylindar together... but it turned out cute for our little man!


Here's my cut pieces. Really, all you'll do is sew the sides together to get a tube, sew the top and then the brim. You'll then put the two sides together and sew the edge of the brim together, turn it and top stitch it.


Sewing the top and brim on were probably the hardest. It helps to divide it up and if your fabric and just a little stretch to it. I think I only sewed one pleat into the top.. whoops. I want to make another soon, so this was good practice!

The finished red side --which hubby thinks is to girly-- so maybe I should have added an something to make it more boyish. Oh well.

The finished denim side! So easy to match! It also added structure, so I didn't use any interfacing. If you didn't use a stiff fabric on one side, I would definately recommend using interfacing on all of it!

I did add a step to the instructions. I added a little darn where the seams met to keep the sides from moving around and making it reverse a little bit easier. If you look closely where the seams met at the top, you can see a little more red thread. That's it. Not even noticeable.

Wednesday, June 9, 2010

I started this one with the goals of something very girly, bright and colorful. I wanted some new granny squares with flowers too. I also wanted to experiment with ombre. I should have done those a little more one at a time, but all together it's not to bad! A little busy for my taste I guess.
I have a love-hate relationship with this blanket. Even though the yarns are the same weight and worst- the ombre was thicker. I don't know if this is common. So, the squares with ombre are bigger and this causes some funny stretches. And I'm swearing off small squares for awhile. I forget how much I hate finishing off threads and sewing them together. I do like the scalloped edges and the fun flower squares. They were fun to make, find online and experiement with!
And I'm on a finish projects kick so hopefully some more will come soon!
Friday, June 4, 2010
New Potatoes and Peas
My Grandma made these creamy potatoes and peas everytime she had fresh peas. Well, my peas sprouted this past week, so I made them. We miss them and need them more than once or twice a year!! (And yes, Landen loaded them up by himself in his truck.)
 You will need:
 You will need:
 About 4 medium red potatoes. Baby Reds work really well too.
1 cup of peas (fresh or frozen and thawed)
3TBSP butter
3TBSP flour
2 cups of milk
salt and pepper
Instructions:
Peel potatoes and chop. Add about 2 tsp salt and boil in 2 inches of water for about 20 minutes. (just like mashed potatoes!) Drain.
Make a white sauce: In saucepan, melt butter and whisk flour, salt and pepper in- about 1/2 tsp each. Stir until bubbly. Slowly add milk whisking constantly. Continue stirring until sauce comes to a boil.
Mix in potatoes and peas. Heat thoroughly, about 5 minutes.
And you're done!!
This is great with a ham steak, leftover roast, with hamburgers, etc.
Monday, May 24, 2010
New Books!
I'm getting my craft on. I have a few pictures to show of a skirt I made, but it's not all ready yet.
 Michael bought me this sewing book for my birthday.... and I finally got it. Seriously, I was lucky because the estimated delivery date was May 26, and he ordered it May 6. Gotta Love Free Shipping on Amazon.
But I love it! The pictures are great! And she has lots of good instruction for basic sewing. Some things I can skip ove and some things, like how to make bias tape, I get all giddy about because I don't know how.
When I made Landen's car tote, I didn't know how to use piping and corner it. She has instructions! Wahoo!
There are some cute patterns I'm going to have to try out too. Like her decorative pillows, but since that's on my list of things to make this summer-- I'm definately on that one!
 While I was perusing The Sewing Bible at Barnes and Noble, my mom said she had a sewing book from her college days that she would just give me. Guess what? It's pretty good too. In fact, it's one that homemadebyjill has blogged about before.
 It's got great clothes-making, pattern following instructions. While I'm not sure I'm going to dive into making clothes, I think it will come in handy. It also goes into more detail about pressure foots, and types of needles, threads, and other notions and when to use them. Which, I could use a little help one.
And now I'm a sewing encyclopedia.
Which is good, because I want to sew more and better. But it's bad because I can't find my universal pressure foot.... and therefore can't go try some of these out!!
Tuesday, May 18, 2010
My KitchenAid
So, I made braided bread with my activity day girls. Yes, it was lots of fun and I have extra bread the neighbors are enjoying to prove it.
But my KitchenAid DIED!!
I have the Professional 5 Series, so we're not talking about the whimpy artisan trying to knead some dough. I got the artisan for a wedding present and I upgraded because I wanted the Pro. I wanted it to make bread, cookies, frosting, or whatever else I want to make. I wanted the big bowl to accomodate a big family. I wanted to make bread. I wanted a KA to last forever and by my favorite appliance. I know I don't use it nearly as much today as I plan on using it in the future. I predominatly use my hand mixer by GE that does the trick for my family of 3 size batches. (minus the bread of course)
My KitchenAid has a good life. It gets used, but not aggressively. It gets wiped down really well after every use. It gets used for fun things like meringue, and worked for things like bread. It has the best seat in the kitchen. I follow all the rules, I don't push my luck. But my mixer has always sounded a little funny and had a funny smell, and when I asked about it when it was under warranty, I was assured it was just because it was a Pro series and has all metal parts.
So here we are, in my kitchen. I'm kneading a good size batch of bread- not huge but not small. It's on speed 2 and working on it's 5-7 minutes of kneading. After 5min and 30 seconds, the KitchenAid starts to smoke. And then it came to a complete hault. Just stops.
I felt like weeping. I felt like throwing a temper-tantrum, laying on the grounds and kicking and screaming. I wanted to throw it out the window. Or in the street, and run over it with my big truck. I've kneaded a few time before, but I've never had any problems. Why? Why now? What about my bread-making for my future family?
I'm a little upset. These things are suppose to last FOREVER. I'm just breaking mine in! My daughter was suppose to learn to make cookies with it. My mom's lasted like 10 years before it needed a part fixed-- and it's still going. And she doesn't have the professional model. I have recently been surfing the blogs... and the rumor is no using the dough hook. WHAT? I paid how much for my machine and the dough hook isn't suppose to be used? This is awful. My dream for my KA is ruined. I guess I should have stuck with the cheaper model then!
So, I called Kitchen Aid. The nearest repair center is Boise, Salt Lake or Orem. You have to bring it to them. Or it costs $32 to get a package to ship the 30lb machine. And you have to pay for labor and parts. I felt like screaming... but I didn't I tried to be sweet. It didn't work. I still have to pay for what I feel like is a nearly new machine to get fixed. What happened to warranties? Why do I feel so let down?
Probably because when I usually call about an appliance or other purchase- I get it fixed for free or just shipping. Sometimes, I get really lucky and it's been recalled and I get a new one altogether.
So Michael promised to look at it. I don't know how I feel about it.
Things never go well when he tries to fix things.
There are pages online about fixing it yourself. Mine isn't the obivous fail-safe gear, so I'm a little leary about it. If it was the gear, I'd just do it.
So what to do? My KA is just sitting there on the counter, mocking me, and begging to be fixed.
Monday, May 10, 2010
I started cleaning and ended up baking
How many times do you start on project and end up doing another? I seem to find myself doing this much more often than I'd like. Today, I started out cleaning my laundry area and bedroom. Somehow it got about halfway done -- I slammed my finger in the washing maching lid and that HURT. Anyway, I sat down and the next thing I know a friend is facebooking about her baking and I discover a MADE post about braided bread. Then I'm baking. I made chocolate zucchini bread and the braided bread. You can read MADE's post and get the recipe... we'll just say it was easy and really good! Especially the cinnamon loaf! We will have to make this recipe again.
For the chocolate zucchini bread I used my dad's recipe, with a few modifications.
In a mixing bowl, combine the following:
1 cup sugar
1 cup brown sugar
1/2 cup applesauce
1/2 cup oil (or 1 cup oil and skip the applesauce)
3 eggs
1tsp vanilla
Sift dry ingredients and add to above:
2 cup flour
1/2 cup cocoa
1 tsp cinnamon
1/2 tsp baking powder
1 tsp baking soda
1/2 tsp salt
Then stir in the following:
2 cup grated zucchini
1/2 cup chopped nuts (I like pecans)
1/2 cup chocolate chips
Place mixture in 2 greased loaf pans.
Bake 350 for 1 hour
Thursday, May 6, 2010
My Summer List
I'm making a list of my summer projects. I have some great ideas and am excited to get started! I figured since I'm done with the semester I should have some more free time.
So, here's what I want to do -- and in no particular order.
- Finish my skirt I started. I just have to figure out how.
- Make Landen a quilt for his "big boy bed."
- Make Landen a play mat/rug. I don't know if you remember those, you can buy them and they are like a whole city to drive your cars on and through. I had a creative revelation and have a great idea on what to do!!
- Organize my sewing stuff-- and get my machine here!
- Make a scrap quilt for my bed.
- Make some decor pillows
And that's all I'm determined to do. I guess we'll see if I add some more.
Tuesday, April 20, 2010
April VT - I got a Feeling!

For my April VT, I'm still without a partner, so I just kept it real simple. I made cupcakes for my Activity Day Girls, and since there are only 5, I still had lots left over. I frosted white cake mix cupcakes with some fluffy strawberry flavored icing and sprinkles. I attached the "I got a feeling" note from VistingTeaching.net. (You can laugh at the birthday print cupcake liners all you want... it went with the AD stuff and it's all I had!)
I really liked that quote too! I think women, probably more than men, receive inspirations through their emotions. I remember last year when we were looking at replacing our Alero and every time we would start to like a car, I would just git this incredibly sick feeling in my gut. I'm glad we listened to those feelings and Michael just didn't brush them off. I know at the time I was very unsure about why I felt that way-- whether I was just getting sick over the dollar amount or if it really was inspiration. Later events told me it was inspiration, but it's always nice to feel validated by prophets and his apostles!
Monday, April 19, 2010
More on my classes...
Haha. Maybe I just think you all can relate to these ideas.
I have a hard chemistry class, that I have enjoyed a little. He is participating in this new system of class review that happen 4 times during the semester and are more specific to the class. He also gets the results sooner... like a few days later. He usually posts about his response to them, and addresses an specific issues. Needless to say, his last posts addresses 3 of the answers I gave specifically. I don't know if other students gave similar answers or if my answers just bugged him. It just makes me squirm a little bit, like someone talking to you about something that was suppose to be confidential. While he never did address me specifically, I sorta felt like it. (P.S. I got another perfect score on my 2nd test... go Angela!)
I have a Parent-Child Relations class too. We have to participate in class discussions every week. Sometimes I get frustrated because I get messed up which week we are suppose to be in because some students went and posted all their discussions way back in the beginning. Then there is one particular student that when I read her posts, I always just want to rip her apart. Like today I really wanted to reply, "Did you read the question? This really doesn't answer the question, either part of it!" Or I feel like saying, "Is that really true?" as she shares some outrageously untrue facts. And she constantly sends the class a mass email wanting to know some "duh" part of the instructions. This last paper she sent out like 3 emails asking how long our final paper had to be, and the instructions of the paper said "limit 5 pages." Or asking if anyone had problems downloading such and such file, because she figured it out and could help them. Really, I usually don't get that annoyed with people, but it seems like she just pushes my buttons just right.
Just 2 more weeks and they will be all over.
Sunday, March 14, 2010
I need to take a moment
and brag about myself.
So, I've been taking a few online courses to keep me busy and brush up because I've been contemplating pursuing my master's degree.
One of my classes is an upper level Environmental Chemistry class. I'm not as opposed to Chemistry as you might think. I generally don't mind it, especially compared to classes like Biology. Which I seem to struggle a little more with. I know that I'm more into the "romantic" subjects -- English, History, Sociology, etc.
We had our first "take-home" exam. I hate take-home essay exams because they are generally hard, thorough and long. This one was a little grueling too. These questions were hard and he expected 700 words per question. Also, at least one part of the question was not found in the book, because he expects you to use outside sources. Here were the first 2 questions:
I stressed about it. I spent hours researching and writing about it. And even after I turned it in I was a little worried about it. Since he hasn't graded anything we had turned in up to this point, I was a little more worried I was just doing things in a general manner which he hated. Which has happened to me before, but usually I do really well in my classes. All this worry about this class was making me sick.
But guess what?
I got a perfect score!!
So, I've been taking a few online courses to keep me busy and brush up because I've been contemplating pursuing my master's degree.
One of my classes is an upper level Environmental Chemistry class. I'm not as opposed to Chemistry as you might think. I generally don't mind it, especially compared to classes like Biology. Which I seem to struggle a little more with. I know that I'm more into the "romantic" subjects -- English, History, Sociology, etc.
We had our first "take-home" exam. I hate take-home essay exams because they are generally hard, thorough and long. This one was a little grueling too. These questions were hard and he expected 700 words per question. Also, at least one part of the question was not found in the book, because he expects you to use outside sources. Here were the first 2 questions:
- Global Warming. Global warming is thought to result from an imbalance between the solar radiation received by the earth and that lost back into space. Describe the difference between the solar radiation and the radiation leaving our planet. Why is infrared, 10 μm emission thought to be most important in this energy balance process? How do trace gas species influence the atmosphere’s temperature? What are the some of the predicted consequences of global warming?
- Stratosphere Ozone Depletion. What is stratospheric ozone depletion? Why is this potentially harmful? What anthropogenic compounds are thought to be primarily responsible for ozone destruction? What is the mechanism, i.e., what role does atomic chlorine play in the chemistry? What historic international agreement addressed this problem? Is it working?
I stressed about it. I spent hours researching and writing about it. And even after I turned it in I was a little worried about it. Since he hasn't graded anything we had turned in up to this point, I was a little more worried I was just doing things in a general manner which he hated. Which has happened to me before, but usually I do really well in my classes. All this worry about this class was making me sick.
But guess what?
I got a perfect score!!
Wednesday, February 24, 2010
Doing Hair
My sister tells me I always have good hair. I'll agree I think my hair is one of my stronger features-- it's healthy and long and naturally has a fair amount of curl. The color is a little ash-y so I like to add some red or some highlights, but generally try to embrace the color. For me, it's not one of those things I lust after everyday, I usually just do it and forget about it the rest of the day.
As one of my friends in high school once said, "Hair, accurately rated. Doing Hair, Overrated!" I have a pattern (shh! don't tell) I wash my hair and dry it and do it down or only partially up. Then next day I don't wash it and usually wear it up. I'll even let you on a more embarrassing secret -- sometimes I wear it up 2 days in a row.
When I wear it up, it usually is in a messy bun. If it starts out differently, well that's what it is by the time I go to bed. Well, I was feeling a little bored and decided to spice things up the other day and try something new.
Check me out!
 P.S. I was inspired by Lauren on ABC Family's Make It or Break It. She is always doing something cute with a french braid.
Monday, February 22, 2010
A Brithday Cake for Michael

I was looking for something delicious to make this year. Last year I made this cake:
This year I decided I want some that made your mouth water and would be less time consuming to make. I toyed with some strawberry cakes, a lemon chiffon, a pumpkin cake, and Michael choose a german chocolate cake.
I decided to make it all the way from scratch. If you think box cakes taste the same as a homemade cake, you're wrong. Very wrong. And if you think they aren't worth the extra work, well you're wrong again. At least not with this German Chocolate Cake recipe. It wasn't to hard and it was so delicious. You will never taste a box cake this good.
I layer the cake by creating a flood wall. (a thick pipe of frosting around the edge) and then smeared some still hot and run traditional German chocolate cake icing-- from the same recipe. Then I iced the sides with Creamy Chocolate Icing, very quickly. I filled the top with the rest of the GCC frosting and tried to be decorative with the pecans. I really put together and iced this cake in about 25 minutes. I wish I would have had more time!! But it still makes your mouth water doesn't it?

Thursday, February 18, 2010
Chicken Tetrazzini
For the Blue and Gold Banquet, I was asked to bring a casserole. I wanted something really easy, super appetizing and cheap. Here's the recipe I came up with.
Chicken Tetrazzini
4 TBSP butter
4 TBSP flour
3 cups of milk
2 TBSP Parmesan cheese
1TBSP Parsley
1/2 tsp salt
1/8 tsp garlic powder or 1 cloves of garlic minced
1/8 tsp pepper
Melt butter in saucepan. Stir in flour, whisking until blended in and bubbly. Gradually stir in milk, whisking until smooth. Add Parmesan cheese and spices. Cook until mixture boils and thickens, stirring constantly.
Mix or layer with sauce in 9x13:
2 cups of chicken, cooked and cubed. I used leftover thanksgiving-turkey
3 oz of angel hair pasta or spaghetti -- I use my pamper chef pasta measuring thing and use about 4 servings. Break in half and cook.
2-4 cups of vegetables. I used a summer squash melody this time but have used other carrots, peas, green beans, etc
Sprinkle with 1/2 to 1 cup of shredded cheese. Bake at 350 for 25 minutes or until bubbly.
And there you have it!!
Wednesday, February 10, 2010
A Car Cozy
I followed homeade by jill's Cozy Car Caddy and made Landen a great new toy! It's great for stashing a few cars for church (I wouldn't recommend taking 6 cars to church) and doubles as a playing mat!
Our JoAnn's didn't hav e a a great selection of duck cloth (black, red, blue, army green) So, I went with the army green to contrast the denim. I picked up the other few odds and ends I didn't have for under $5! WaHoo!
So, Here's what I did. I followed Jill's directions because I liked the idea of the piping and the heavier cloth. BUT if I was making it again, I'm not sure I'd use duck cloth. My Little Gem's Car Cozie Tutorial used flannel, so I think any fabric would be good. Why? Well, it was really hard to sew the binding into it and then turn it and sew around it again. It was 8 layers of heavy fabric and my machine is a little old. But if your kid is rough on stuff, it might be really good.
But, it worked out great. I used wonder-under on the felt pieces, plus I stitched around the edge of the road. I guess I didn't pay attention to the dimension when I bought the felt because my felt wasn't long enough and I had to use two pieces, you could definitely use flannel or cotton here too. For the "parking" spaces, I went over them divided twice, and decided not to paint the number on. I think it looks cute without it. Landen loves these! He parks all his cars and then reparks them it's very cute!
 I loved the idea of denim on the outside. So, I cut my car out of some yellow flannel scraps and used buttons on the wheels to avoid more sewing. (I was getting tired of it) And I think they are really cute! I sewed them on really good, and it's a good thing because Landen sure likes to pull on them!
Our JoAnn's didn't hav
 e a a great selection of duck cloth (black, red, blue, army green) So, I went with the army green to contrast the denim. I picked up the other few odds and ends I didn't have for under $5! WaHoo!
So, Here's what I did. I followed Jill's directions because I liked the idea of the piping and the heavier cloth. BUT if I was making it again, I'm not sure I'd use duck cloth. My Little Gem's Car Cozie Tutorial used flannel, so I think any fabric would be good. Why? Well, it was really hard to sew the binding into it and then turn it and sew around it again. It was 8 layers of heavy fabric and my machine is a little old. But if your kid is rough on stuff, it might be really good.
But, it worked out great. I used wonder-under on the felt pieces, plus I stitched around the edge of the road. I guess I didn't pay attention to the dimension when I bought the felt because my felt wasn't long enough and I had to use two pieces, you could definitely use flannel or cotton here too. For the "parking" spaces, I went over them divided twice, and decided not to paint the number on. I think it looks cute without it. Landen loves these! He parks all his cars and then reparks them it's very cute!

Tuesday, February 9, 2010
Cake Balls
So, I know this recipe has been floating around the blogsphere for like years. And I distinctly remember a fellow bloggers post with a recipe similar to this, but thinking it didn't look that good.
I was wrong.
Don't these just look amazing?

 They are incredible. Red velvet cake dipped in chocolate? What could be more divine? I decided to give them a try for party we went to. They were a great hit, and I was sorely disappointed that they all disappeared- because there wasn't any to bring home!
So Try them out on your honey for V-Day! Red Velvet Cake Balls by Bakerella
I was wrong.
Don't these just look amazing?
 They are incredible. Red velvet cake dipped in chocolate? What could be more divine? I decided to give them a try for party we went to. They were a great hit, and I was sorely disappointed that they all disappeared- because there wasn't any to bring home!
 So Try them out on your honey for V-Day! Red Velvet Cake Balls by Bakerella
Saucy Meatballs

Today, I'm so excited to try Kitchen Cafe's recipe for Saucy Meatballs. I decided to try them over rice for dinner, but these would do much better as an appetizer. Like for the super bowl, so I'm a day late and dollar short! :)
I followed the recipe pretty closely, but I modified it for 1 pound of hamburger, so here is the recipe w/ the adjustments.
Meatballs-
1 lb of hamburger
1/2 cup of quick oats
2/3 cup of milk
2TBSP of minced onion
1 tsp of salt
2/3 teaspoon of pepper
Combine. Roll into medium sized balls. I used my cookie scoop, which makes them about the size of walnuts and I got exactly 30 meatballs. Put them on a pan and freeze them for 5 minutes. Then roll them in some flour and brown them in 1/3 cup of canola oil. I put my pan on medium high heat. You want the outside nice and brown, but uncooked inside. Then I put them in a 9x13 glass dish. Pour the sauce over and cooked for 40 minutes.
I left the sauce the same-- 12oz jar or cocktail sauce, 1 can of whole cranberry sauce, 1 cup of brown sugar and 1 cup of white.
I also cooked brown rice to serve over it with a side of veggies. It was SO GOOD. The meatballs were the most perfect texture and held together really well. And the sauce was so good. We couldn't stop licking the spoon! LOL. But there is a lot so I will have to find another use for it.
Tuesday, February 2, 2010
The Secret to a Good Cheesecake is ....
....lots of work, patience, cream cheese, eggs and lots of calories.
So, Try my simpler still incredibly delicious solution!
Grandma's Cheesecake Pie
1. Beat 4oz of cream cheese (half of a package) and 3/4 cup of sifted powdered sugar.
2. In a separate bowl, whip 1 cup (or half a pint) of whipping cream until it forms soft peaks
3. Fold the two bowls together with 1 teaspoon of vanilla.
Want to know how to use it?
- Fits an 8x8 pan, 8" pie plate or 12 cupcakes
- Try a graham cracker, oreo, pretzels or vanilla wafer crust
- Put sprinkles on it.
- Stir in some berries
- Drizzle chocolate or caramel on top.
- Put it in the freezer for a frozen taste.
- Put some food coloring in for the holiday--
I made a batch in a cupcake pan. I had some heart print cupcake liners, that I put a whole Oreo in the bottom. I added a little red sprinkles on top so we had some for Valentines Days!
Try this topping: Berry Glaze Topping
mix 1/2 cup of sugar with 1/4 cup (4TBSP) of cornstarch in a pan. Puree 1 cup of berries and 1/2 cup of water. Add water to make 1 2/3 cups. Stir on medium heat until it thickens and boils, add 2 cups of berries
Monday, February 1, 2010
Black Crocheted Blanket - Repurposed
So, I started this blanket back before I was married and never finished it. While I pregnant with Landen, I finally had enough of it laying around unfinished and just finished it. It was crocheted with a half-double, which is a small thick stitch and made the blanket fairly hot. Looking back, this was probably not the best idea. I decided I hated it. I'm ashamed to say that it was so poorly done! The edges weren't straight, and I didn't know much about dye-lots. I stopped and started it so many times too! LOL, So this is what the mess looked like.

I couldn't really stand this blanket and the only function it served was under a sheet on the airbed when company came to stay. But the yarn is really nice and it was expensive. So, after much contemplation I decided to re-purpose the yarn into another blanket.
 This time around I decided to do a granny square with size K hook. I choose the particular block because,
1. It's easy.
2. It hides flaws in the yarn (from undoing the blanket)
3. It hides mistakes.
4. Since it's blocks it makes it easier to make a square blanket.
5. I think if I shuffled around the different shades I could get it to look pretty good and not as tacky.
My new goal was to have to blocks completed by the end of January. I'm proud to announce that 137 blocks later, I finished my last one last night!! Here they are, stacking against the wall.
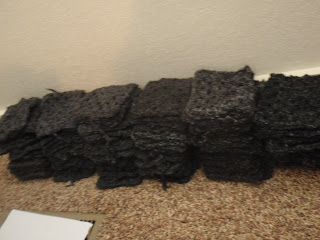
So, My next dilemma is this: how to sew them together. I started out with a full/queen size blanket, and I now I have 137 5-inch blocks. While I would make a few more to get the exact number I need, I don't want to be crocheting the 123 blocks I would need to make it the same size as before.
I do have enough to make a smaller twin size blanket, but I'm not sure what purpose that would serve at my house where we have a queen size bed and a crib. I thought about making a throw, but that would make either 1 really big one or 2 smaller ones. I was thinking about making one all black, and then maybe getting red or white and making a checkerboard out of the other one. But my living room color scheme doesn't match, so the next question is who wants one?
Thursday, January 28, 2010
Mission Statement and Purpose
As a stay-at-home mom, I think I fall into a large category of women who lose a little bit of their self-worth by 'just staying home.' I often feel like I need to be out conquering the world, making my mark and changing it for the better. I feel in order to do it, I must go outside my front door, get a job and participate in the world. I remind my self that staying home and raising my child is doing just that, but I often lack that bridge of really feeling like I am. I decided I needed to feel like I am
I am trying to rent the shackles that bind me to my bad habits while I am at home. I am trying to anxiously engage myself in a good cause-- a cause that makes my home and my world a better place.
In order to do that, I wanted to create a place where I could record the these I do-- the things I am doing to develop my talents, serve others, raise my little boy, and engage myself in wholesome things. I wanted it to be someplace I could get to easily and review easily. And then it struck me that I should be sharing these things to. I know that in my circle of friends and family, we could all use a little reminder, a few good ideas and a refresher of the good things we do and can do.
So, here it is. What I am doing to anxiously engage myself in a good cause.
Subscribe to:
Posts (Atom)